
Below I’ve outlined some of the basic considerations I use when deadlifting with a Hex Bar (Trap Bar). To download this as a PDF simply click here.
Each coaching point has a corresponding label on the stick figure.
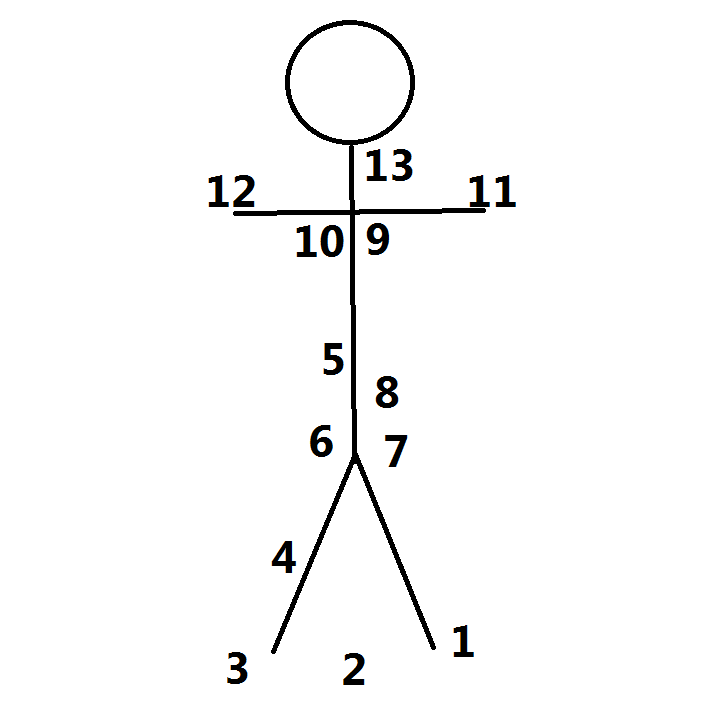
- Footwear. If possible, sturdy flat-soled shoes or bare feet are preferable to standard trainers. Avoid any shoes with a big heel.
- Shoulder-width stance. Your feet should be in a position where you feel naturally strong and athletic.
- Mid-foot push. When you lift, it’s common for people to rise up onto their toes. This is wrong, and to compensate for that a lot of personal trainers will tell you to push through your heels. The ideal pressure should be on your mid-foot, so focus on driving through the middle of your feet.
- Knees out. Again, it’s common for people to let their knees cave in as they stand up. A cue is to drive your knees out, though this is to find a middle ground and you don’t actually want the knees to come out. Imagine someone has their hands on the outside of your knees and is trying to push them together. Resist that imaginary push.
- Flat back. The most important part of the deadlift. As soon as it rounds you’re in a weak position. For beginners, make sure your back is flat as you go down for the initial pick up and if necessary correct any rounding after each rep. If you are a beginner doing 5 reps, there’s nothing wrong with stopping after each rep and going through the proper set up each time.
- Hip hinge. The deadlift is a hip dominant movement, the squat is knee dominant, and the Hex Bar is somewhere in-between. Drift the hips backwards as you bend to initially pick up the weight, creating some tension in the back of the legs (hamstrings). This is like loading a spring and allows you to store some force to help with the initial pull.
- Tense glutes. Tense the glutes (bum) as if someone is going to punch you in the bum cheek and not as if you really need a poo. We want to tense the big muscular glutes, not the sphincter.
- Valsalva. Imagine you are wearing a really tight belt and you want to brace your belly against it. A weightlifting belt is simply a tight belt and helps lifters with this cue. This is important for creating stability around the lower back as you lift and the cue should be used just before the initial lift and whenever the weight is close to the ground.
- Shoulders down and back. You want quite a prominent chest position, some call it the “beach pose”. Increase the distance between your shoulders and your ears by dropping the shoulders down, then pull the shoulders back and open up the chest.
- Tight underarms. This cue can be active the whole time you’re lifting. Imagine you have a £20 note under each arm and you want to stop people stealing them.
- Squeeze the bar. By squeezing the bar you’re creating tension through the arms that will help with the lift.
- Remove the slack. With some bars you find that if you jiggle it you’ll get a bit of movement. Pull gently on the bar before you do the actual lift to get rid of this slack.
- Neutral head and neck. If you raise your chin up too much your body will sense you are in a vulnerable position and limit maximal force. You want your spine and neck to form a straight line, so think of your torso and head as one complete unit.
A big thanks to Rick (The Stick) for posing long enough for me to draw him.